


This guide was created based on the Swedish market. Always check local laws and regulations.
WHY USE WARNING LIGHTS?
The purpose of warning lights is to warn or alert your fellow road users on something. This could for example be that the vehicle must be parked on the road or that the vehicle must be driven in a way that could be an obstacle.
WHEN CAN WARNING LIGHTS BE USED?
- 1. Road maintenance work or similar
- 2. When towing or transporting a towed car
- 3. Vehicle inspection or equivalent
- 4. At the scene of an accident or equivalent
- 5. When the vehicle width including equipment exceeds 3 m
- 6. When warning lights is a specific condition for travel on the road
- 7. By traffic director when escorting long, wide or heavy haulage
- 8. In other with 1-6 comparable cases
Source (in swedish): Transportstyrelsen (TSFS 2009:83)
To further complicate things there are different qualification demands depending on which type of work or role you perform. It’s up to you as a user to ensure that you have the required knowledge. The competence requirements (link in swedish) are divided into three levels and the courses held are usually called “Working on the road”.
WHAT APPLIES FOR WARNING LIGHTS?
There are several rules regarding products, installation and use of warning lights that are required to adhere to.
PRODUCT REGULATIONS
- If you buy from us at Work System, you can rest assured that our products live up to the requirements (see below)
- 1. The warning light must be approved according to REG 65 and emit orange-yellow light that gives the impression of flashing. All warning lights that Work System sells have an approved flash pattern. However, some products may have reprogrammable flash pattern where not all variations meet the requirements.
- 2. The warning light must be type-approved in accordance with ECE 65 or by Vägverket/Trafiksäkerhetsverket (Swedish authorities).
- 3. The warning light must have ECE R10 classification according to EU regulations to avoid interference with other electronic equipment in the vehicle. The classification means that the warning light has been tested for both outgoing and incoming electromagnetic radiation.
INSTALLATION REQUIREMENTS
- When using Work System as fitter the installation should always meet the requirements unless you as customer requires anything else. Also don’t forget to inform us of any specification of requirements.
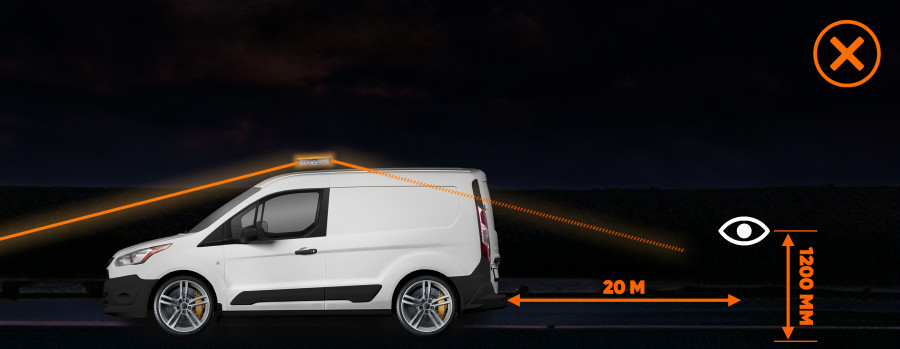
- 1. Warning lights must be positioned so that the center of at least one light source is visible 20 m from the vehicle at a height of 1,20 m from ground level regardless of angle i.e. 360° around the vehicle.
- 2. Warning lights must be positioned so that the axis of symmetry is orthogonal to the ground level i.e. the light must be emitted straight out in the same angle as the ground.
- 3. Vehicles equipped with warning lights must have an indicator lamp visible from the driver’s seat that glows in orange-yellow when the warning lights are switched on.
- 4. If the vehicle is equipped with more than one warning light, they must be connected so that they are switched on and off simultaneously. It’s therefore not permitted to have individual warning lights switched on.
EXAMPLE OF PLACEMENT AND INSTALLATION
Below you find both good and bad examples of warning light installations.
Minimum
This setup with a highly placed beacon meets the requirements, but is still far from optimal and is therefore not recommended.
Medium
What many people might not think of when it comes to this installation is that the car top blocks the light backwards and therefore it’s unapproved.
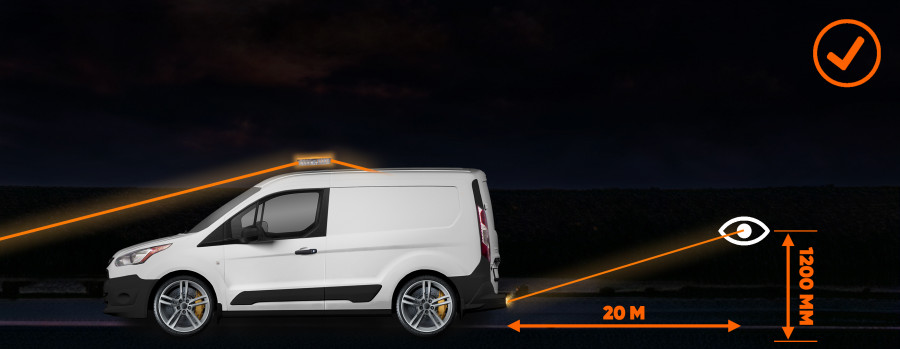
By supplementing the warning light bar with directional warning lights in the rear bumper, you get an approved installation.
Optimal
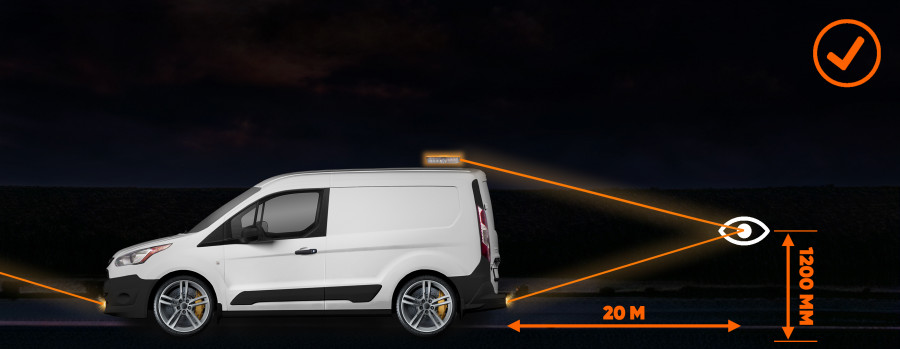
90% of those asked would probably say that it’s most important to be visible from the back. If the warning light bar is placed far back on the car top, you get a large light image in that direction. Complete the installation with directional warning lights on the front/rear bumper for an approved installation. Highly recommended for those who frequently works on the roads!
CONSIDER THIS BEFORE ORDERING
Please consult one of our sellers to find the right solution or product for your project. Simply let us know your requirements and we will create a quote for you. Also, don’t forget to inform us of any requirement specification. If you place the order yourself in our web shop, there are a few things you need to consider (see checklist).
CLASS 1 AND CLASS 2
There are two different classifications of warning lights – class 1 and class 2 (TA1/TA2). The distinction here concerns the ability to lower the brightness in dark environments. Class 1 is not adjustable while class 2 have a night-time dimming which removes part of the brightness. The adjustment Is performed by either a sensor on the warning light or a button inside the vehicle.
Class 1 - Is the lowest classification a warning light must have. A perfectly adequate alternative unless you or your employer have other requirements. Class 1 is usually both cheaper and easier to install.
Class 2 - has two modes: one for daylight and a night-time dimming to prevent glare. In some cases, the contractor may have class 2 as a requirement for the procurement.
CONNECT the warning lights DIRECTLY TO THE CAR’S BATTERY?
If you intend to run the warning lights directly on the cars battery we always recommend to add a battery monitor or use our control system. The power will then be cut off if the voltage gets too low and you don’t have to worry about draining the battery. If an extra battery, that is separated from the original battery, is used for the warning lights a battery monitor isn’t crucial but still recommended.
In general, when it comes to batteries the voltage should never fall below 12V to avoid damaging the battery and shorten its lifespan. How much you can discharge before this happens depends on the battery type (lead-acid = 50%, AGM = 75%, Lithium = no limitation). At the same time, it is at least as important to have the warning lights on, so it’s up to you as user to keep your priorities straight.
Control
If you are going to install several types of lighting, for example, warning lights, work lights and interior lighting, our control system I recommended. It has battery monitor, fuses and timer built-in and is a cost-effective alternative to buy everything separately. In addition, there is a matching remote control for a neat and practical installation. The other option is the classic buttons and fuses.
CHECKLIST FOR ORDERING
- When you picked the setup for your warning lights you need to buy mount, cabling and controls. The products displayed on our website only include the warning light itself (unless otherwise stated). To make the process easier, you will automatically receive suggestions for suitable accessories when you add a product to the shopping cart.
- 2. Choose a mount (if not included in the product)
- 3. Select cabling and control
Remember to buy the right length on the cable. You need more cable than you think when it should run as invisible as possible from point A to point B. For example, an 8 m cable usually only reaches approximately 4 m between the connection points.
EXTRA VISIBILITY WITH ROOF SIGN AND X2-SIGN
If you need to be extra visible on the road you can use our roof signs and X2-signs. To fulfill the requirements, it’s important to follow the criteria’s set by your contractor.
PLACEMENT REQUIRMENTS
- 1. The lower X2-sign must not be placed higher than 1200 mm from the ground to its bottom edge
- 2. X2-sign must be centered and no narrower than 200 mm of the vehicle’s total width i.e.a 100 mm indentation per side.
- 3. The lower X2-sign may have a gap of maximum 500 mm to be used with for example tow bar.
- 4. The X2-sign must be 400 mm high. If there’s multiple X2-signs it's sufficient if they are 300 mm.
- 5. The X2-sign must be place with a minimum 1000 mm between each other.
- 6. Any road signs must be placed between or above the X2-sign.
On the image below you see an approved installation according to the Swedish Transport Admininstration’s (Trafikverket) regulations.
.jpg)
KEEP IN MIND THAT…
- - The X2-signs can be mounted on both doors and bumper, but be aware that mounting on bumpers may interfere with any parking sensors.
- - You may need to supplement with warning lights behind the sign to comply with the visibility requirements.
- - The L8H-lamps on the roof sign doesn’t count as warning lights.
- - When the A20 sign or roof sign is fold-up the warning lights must be switched on.
Don't forget that the Swedish Transport Administration or other clients may have higher requirements for certain roads or vehicles, for example TMA cars. There are also examples where the requirements are lower, for example in some municipality.
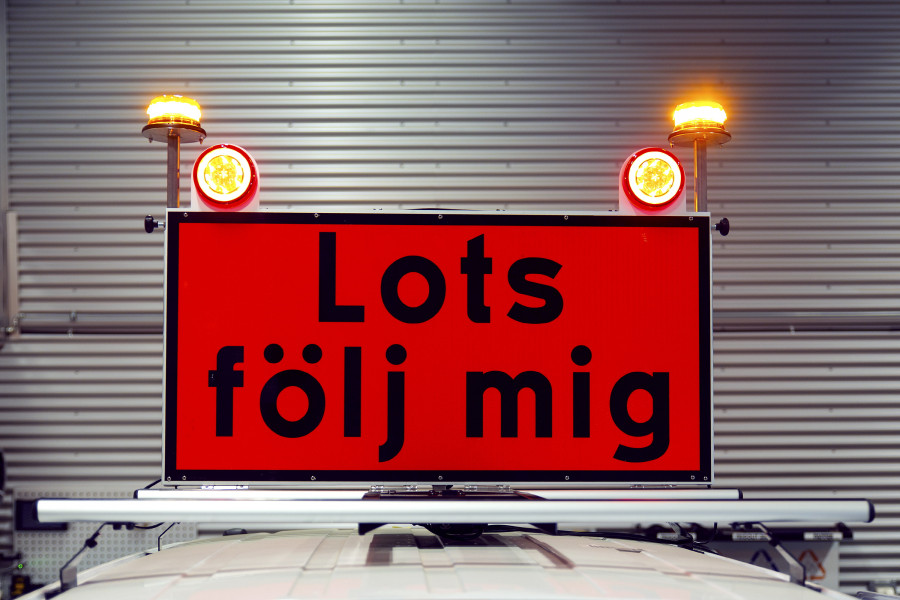
EXAMPLES OF SIGNs IN OUR RANGE
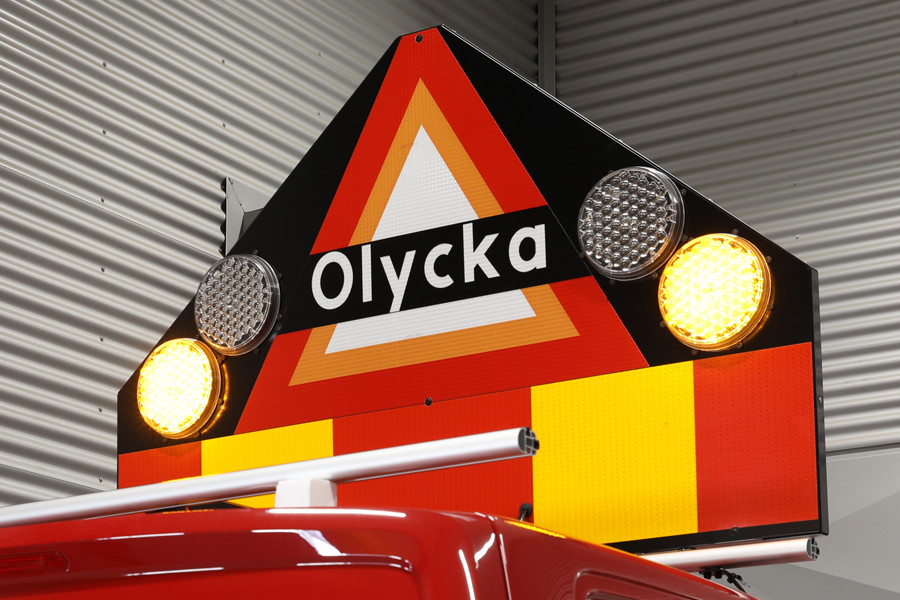
A20

Accident
Wide load/Traffic director/warning

Pilot
PICK UP SIGNS
We also have flatbed signs adapted for installation on pick ups/flatbed vehicles. The biggest advantage of these is the slim design.


